Translating WordPress Themes Plugins
This article will show you how to get this done for new wordpress themes plugins and updates so you will be able to translate any plugin into any language.
Creating a Plugin to Experiment
The first step you will need to create a plugin to experiment. If you already have one, great, if not you can follow our detailed plugin development guide. If you need a quick example plugin, let’s create one now together.
All we’ll be doing is adding some motivational text to the header. Think the Hello Dolly plugin with explicit, motivational text, not lyrics.
First, create a folder in your wordpress themes plugins directory and name it wp-admin-motivation. Then, create a file within that folder named wp-admin-motivation.php. The code to paste within that file is below.
<?php /* Plugin Name: Admin Motivation Plugin URI: Description: Shows motivational messages in the admoin bar Author: Daniel Pataki Version: 1.0 Author URI: Text Domain: wp-admin-motivation */ function get_motivation_text() { $motivation = array( 'You are awesome', 'This website is boss', 'You look great today', 'Your earlobes are well rounded, good job!' ); shuffle( $motivation ); return $motivation[0]; } add_action( 'admin_notices', 'show_motivation_text' ); function show_motivation_text() { $text = get_motivation_text(); echo " $text "; } add_action( 'admin_enqueue_scripts', 'motivation_assets' ); function motivation_assets($hook) { wp_enqueue_style( 'motivation-styles', plugin_dir_url( __FILE__ ) . 'styles.css' ); }
The Hello Dolly plugin adds CSS by simply outputting it in the header. This is not really the correct way of doing things so lets enqueue a stylesheet instead. This is done by hooking the motivation_assets() function to admin_enqueue_scripts and enqueueing the stylesheet there.
The stylesheet positions the text and takes care of RTL (right-to-left) issues as well.
#wp-admin-motivation { float: right; padding-right: 15px; padding-top: 7px; margin: 0; font-size: 11px; } .rtl #wp-admin-motivation { float: left; padding-left: 15px; }
With all that done, the only problem is that it only works in English. If you wanted to use another language you would need to create the exact same plugin, replacing the strings to the target language. This seems like a waste, there must be – and indeed there is – a better way.
Internationalizing a Plugin
Internationalizing a plugin essentially means making it ready for translations. This involves wrapping translatable strings in special functions which will be used later to load the correct translations.
There are a number of internationalization functions, but for our simple plugin we’ll take a look at just one and then talk about the others later once we understand the example.
The function we’ll be using is __(). This function takes two arguments: the text to translate and the text domain, it looks something like this in action:
<?php $greeting = __( 'Hello There!', 'text-domain' ); ?>
The function returns the translation for the marked string if it exists. If it doesn’t, the original string is returned.
It uses the current language to determine the needed translation. You can switch languages in WordPress in the Settings section, whatever setting is selected there will be applied to all translations.
The text domain is the final missing piece of the puzzle. A text domain is a way to group translations that belong together. WordPress themes you are running will have its own text domain and so will all your wordpress themes plugins. This makes it easy to differentiate between them.
Note that for wordpress themes plugins the text domain should be the name of the plugin’s folder. In our example this means the text domain should be wp-admin-motivation. To internationalize our plugin all we need to do is wrap our strings in the __() function.
$motivation = array( __( 'You are awesome', 'wp-admin-motivation'), __( 'This website is boss', 'wp-admin-motivation'), __( 'You look great today', 'wp-admin-motivation'), __( 'Your earlobes are well rounded, good job!', 'wp-admin-motivation') );
Implementing Translations
We’ve now marked translation ready strings, but there are no translations anywhere in sight. We need to tell WordPress where translations for our plugin reside. The standard is a lang directory within our plugin. Create that now and use the following code in the main plugin file to let WordPress know where to look for translations.
add_action('plugins_loaded', 'wan_load_textdomain'); function wan_load_textdomain() { load_plugin_textdomain( 'wp-admin-motivation', false, dirname( plugin_basename(__FILE__) ) . '/lang/' ); }
The load_plugin_textdomain() function is key here and it must be called from within a function hooked to plugins_loaded. The first argument is the text domain which we’ve talked about, the second has been deprecated and the third is the location of the language folder.
Our translation files will be named [plugin-name]-[locale].mo. I’ll show you how to make these a bit later, for now remember that you will place your files in here. In our example a German file would be named wp-admin-motivation-de_DE.mo. You can look up the WordPress locale if you don’t know it.
At this stage if we had language files everything would be working just fine so the last step is to create translations.
Creating a Translation
There are a number of ways you can create translations but the end result is always the same. You will end up with two files, a po file and an mo file. The po file is a human-readable translation file. You can open it in any text editor and edit it. The mo file is apo file which has been converted to a machine-readbale format. This is much smaller in size but completely unreadable of course.
The translatable bits in a PO file can be generalized like this:
#: path-to-file:line-number msgid "string to translate" msgstr "translation goes here"
Since the locations of the strings are given right down to the line number you may be thinking that this will be a bit hard to create and maintain. This is why we have custom tools to help us out! Once you have a plugin in the repository the admin tools allow you to generate a .PO file but you can also create one with the awesome and free Poedit.
Download and fire up Poedit, click on New and then New Catalog. In the window that pops up fill out your details. You don’t need to worry about the charset and plural forms right now, just the basic details.
Switch over to Source paths and let’s discuss the base path and paths. The big box labeled Paths tells Poedit where to search for translatable strings in relation to the base path.
We’ll be putting our translations in a sub-directory of our plugin. This means we have two options:
- Set the base path to
../(parent directory) and set a path in the paths section to.(current directory) - Set the base path to
.current directory and set a path in the paths section to../
The next step is to set the keywords we use in the “Sources keywords” section. Here we define the names of the translator function we used. In our case we just need to add one – __. More likely than not you’ll be adding at least 2-3 functions here, take a look further down for advanced translation.
When you click through, Poedit will scan the files and spit back any translatable strings. It will organize them into a list you can click through, writing the translations in the bottom-most page.
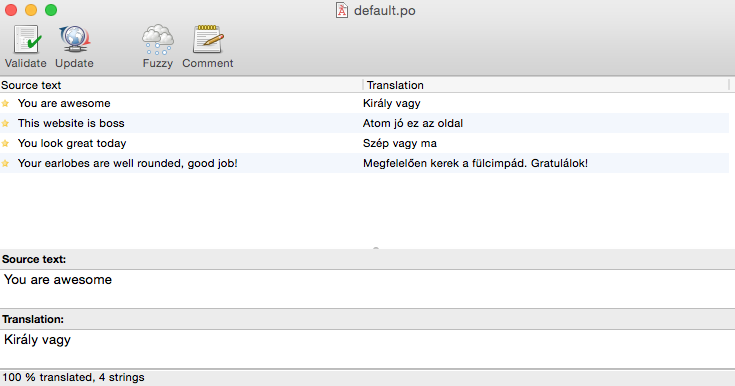
Once you’re happy with your translations save the file, it should auto-generate an MO file for you. By default the file name will be default which you will have to change to the one discussed above: [plugin-name]_[locale].mo. The name of your PO file is irrelevant although for sanity’s sake I would name it the same.
In my example I’ve translated to Hungarian so my file name is wp-admin-motivation-hu_HU.mo. Once this file is in place the plugin will show the specified text in Hungarian as long as my WordPress instalation is set to use the Hungarian language.
Maintaining Translations
Updating translations is not the pain it sounds. While it is true that the PO file contains the location of the translated text down to the line number, these aren’t taken into account when WordPress uses the file. The location and line number is for the translator to be able to look up the string if needed.
As long as you are just juggling code around without changing the translatable string contents you will not need to update the language files. What I usually do is create a POT file, this is the only file I update every time I update the plugin itself, even if strings don’t change.
POT files are just like PO files but they do not contain any actual translations – they are template files. As long as this template file is updated and contains the right line for each string new translations can be made easily.
If you do need to update a language file you’ll need to open it up in Poedit and click on the Update icon. Poedit will notify you of changed and new strings and you can then go in and edit them as needed.