What’s Plugin and How to Select and Install
Concept
Plugins are ways to extend and add to the functionality that already exists in WordPress.
The core of WordPress is designed to be lean and lightweight, to maximize flexibility and minimize code bloat. Plugins then offer custom functions and features so that each user can tailor their site to their specific needs.
Default Plugins
The following two plugins are included with WordPress core:
- Akismet
- Akismet checks your comments against the Akismet web service to see if they look like spam or not. You can review the spam it catches under “Manage” and it automatically deletes old spam after 15 days.
- Hello Dolly
- This is not just a plugin, it symbolizes the hope and enthusiasm of an entire generation summed up in two words sung most famously by Louis Armstrong. Hello, Dolly. This is, by the way, the world’s first official WordPress Plugin. When enabled you will randomly see a lyric from “Hello, Dolly” in the upper right of your Administration Panels on every page.
Finding Plugins
You can find WordPress Plugins in the Administration Screens > Plugins > Add New screen, or directly via the WordPress Plugins Directory.
Two Key Factors to Consider Before Selecting a WordPress Plugin to Install
Because of feature enhancements and bug fixes, WordPress’ code is updated on a fairly regular basis. After each update, there’s always a chance that a plugin that worked with the older version of WordPress may not work with the new one.
To make a particular plugin work with the latest version of WordPress, it needs to be updated as well and therein lies the problem. Since most plugin developers offer their work for free, they sometimes drop the project somewhere along the way and the plugin stops getting updated.
These plugins are “dead” and if a plugin you are using dies, you’ll need to search for a replacement.
To minimize the chance that you’ll face this headache, you should always pay attention to these two factors when selecting a plugin to install:
When Was the Plugin Last Updated?
A plugin that gets updated often is a plugin that is less likely to die.
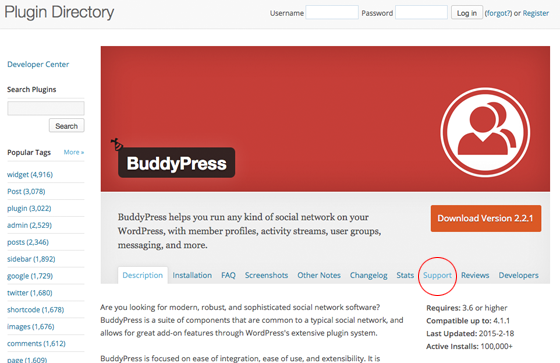
To figure out if your plugin has been updated to the latest version of WordPress, first visit the plugin’s page on wordpress.org and look underneath the header on the right. There you’ll see up to which version the plugin is compatible
Another way to check this is to search for a plugin using your WordPress dashboard (more on how to run that search in just a bit).
As you can see in the search results below, one of the plugins was tested and declared “Compatible” and one was not. Always try to select plugins that are tested and compatible as that means they’re up to date (assuming of course that you keep your WordPress version up to date which you should).
One other thing to beware of is when the “Last Updated” date is more than a year old (and many, many of them are). If that’s the case, it’s likely that the plugin is dead.
Do the Developers Provide Timely Support?
Since most plugins are free, there’s not a lot of incentive for a developer to provide support. They need to have the passion to continue supporting their work and the drive to see it through.
As this is the case, you should always check on the level of attention a developer devotes to support before selecting their plugin. To do so, visit the plugin’s page on wordpress.org and click on the “Support” tab as shown below:
Once you’re at the support discussion forum for that plugin (as shown below), look around to see what you can find. Does the developer respond in a timely manner or do questions languish for weeks? Do they provide service with a smile or are they snippy and rude?
Bad service is a strong sign that the plugin may be dying.
How to Install a WordPress Plugin
Automatic Plugin Installation
To add a WordPress Plugin using the built-in plugin installer:
- Go to Plugins > Add New.
- Type in the name of the WordPress Plugin or descriptive keyword, author, or tag in Search Plugins box or click a tag link below the screen.
-
Find the WordPress Plugin you wish to install.
- Click Details for more information about the Plugin and instructions you may wish to print or save to help setup the Plugin.
- Click Install Now to install the WordPress Plugin.
- The resulting installation screen will list the installation as successful or note any problems during the install.
- If successful, click Activate Plugin to activate it, or Return to Plugin Installer for further actions.
Some WordPress Plugins require more steps to customize them. The Details ReadMe file should contain step-by-step instructions. After installation, this information is available on the Plugins Screen for each Plugin.
Manual Plugin Installation
There are a few cases when manually installing a WordPress Plugin is appropriate.
- If you wish to control the placement and process of installing a WordPress Plugin.
- If your server does not permit automatic installation of a WordPress Plugin.
- The WordPress Plugin is not in the WordPress Plugins Directory.
Installation of a WordPress Plugin manually requires FTP familiarity and the awareness that you may put your site at risk if you install a WordPress Plugin incompatible with the current version or from an unreliable source.
Backup your site completely before proceeding.
To install a WordPress Plugin manually:
- Download your WordPress Plugin to your desktop.
- If downloaded as a zip archive, extract the Plugin folder to your desktop.
- Read through the “readme” file thoroughly to ensure you follow the installation instructions.
- With your FTP program, upload the Plugin folder to the wp-content/plugins folder in your WordPress directory online.
- Go to Plugins screen and find the newly uploaded Plugin in the list.
- Click Activate to activate it.
Check the Details readme file for customization and further instructions.
Uninstalling Plugins
To uninstall a WordPress Plugin:
- Go to Plugins screen.
- Find the Plugin you wish to deactivate and uninstall.
- Click Deactivate.
The Plugin will initiate the deactivation.
Most WordPress Plugins have an option to completely uninstall themselves, though not all. If you wish to remove a WordPress Plugin permanently:
- Check the WordPress Plugin instructions in the Details readme file on how to properly uninstall the Plugin.
- If the WordPress Plugin required the addition of code to the WordPress Theme, manually edit the Theme files to remove it.
-
Deactivate the Plugin and remove it manually through your FTP program.
- Login to the site via your FTP Program.
- Go to the WordPress Plugins Directory and find where the Plugin is installed.
- Delete the WordPress Plugin folder and/or files from your server.