Custom Post Types for Your WordPress Themes
Before getting into custom post types I think we should clarify some terminology since the naming convention results in a bit of confusion.
It is best to think of a post as a unit of content stored in the database. Each post has a post_type property, which defines what type of content it is. Here’s where things get tricky. One of the most commonly used built-in post types is named “post.”
This means that “post” can refer to any post entered into WordPress (whether this is a blog post, a page or a custom type), but it can also refer to a regular ol’ blog post.
For the purposes of this article I will be using “post” in its general meaning of an entry in the database. When talking about posts with a post type of post I will use the “blog post” convention.
Custom Post Types
In essence, a custom post type is nothing more than a change in the post_type attribute of a post. If you publish a blog post on your website and go into the database to rewrite the post type from “post” to “page” the post will now show up in the pages section in the admin.
WordPress defines a bunch of properties for each post type. Is the particular post type searchable? Is it visible in the admin? Can categories and tags be assigned to it, does it allow comments? A number of these features can be set for each custom post type.
So what is a good example of a custom post type? Let’s assume you love food and cooking. Chances are you have a website where you write about your personal things, but now and then you publish a recipe. A recipe is a very different type of content than a personal blog entry. In this case it may be appropriate to create a “recipe” post type.
Built-In Post Types
Now that we understand a bit about custom post types, let’s take a look at the post types WordPress uses by default. Many people know about posts (post) and pages (page) but did you know that uploaded images are also posts? They use the attachment post type.
Surprisingly enough there are two more: revisions (revision) and navigation menus (nav_menu_item). Revisions are just like posts but they contain the data about past versions of posts. Navigation menu items hold information about each separate item in the navigation system.
Creating A Custom Post Type
All the code in this article is best placed in a plugin. If you’d like to just give it a quick go you can place it in your theme’s functions file, but I advise moving it to a plugin for production use.
To create – and highly customize – a post type you would only need a single function: register_post_type(). The documentation for it is pretty hefty but allows for some great modifications. To register a very simple custom post type you’ll only need a couple of lines:
function my_custom_post_types() { register_post_type( 'recipe', array( 'public' => true, 'label' => 'Recipes' ) ); } add_action( 'init', 'my_custom_post_types' );
Let’s analyze the basics. Notice that register_post_type() is used in a function that is hooked to the init action. It takes two arguments: the custom post type and an arguments array. The custom post type should be 20 characters at most and must not contain any spaces or capital letters. I also recommend writing singular forms (post, page, recipe, book, etc.). We’ll be looking at the arguments in a detail soon.
Customizing Post Types
There are three main things you can do to customize your post types:
- Modify the arguments of the
register_post_type()function - Add custom interaction messages (post deleted, updated, etc.)
- Adding help sections to various screens in the custom post type admin
Let’s take a look at the most common arguments you can change when you register the post type and then turn our attention to the interaction messages and help text.
Description and Labels
If you use the simple method of registering a post type you’ll notice that buttons still say things like “New Post” and “Delete Post”. These can be customized using thelabels property of the argument array.
function my_custom_post_types() { $labels = array( 'name' => 'Recipes', 'singular_name' => 'Recipe', 'menu_name' => 'Recipe', 'name_admin_bar' => 'Recipe', 'add_new' => 'Add New', 'add_new_item' => 'Add New Recipe', 'new_item' => 'New Recipe', 'edit_item' => 'Edit Recipe', 'view_item' => 'View Recipe', 'all_items' => 'All Recipes', 'search_items' => 'Search Recipes', 'parent_item_colon' => 'Parent Recipes:', 'not_found' => 'No recipes found.', 'not_found_in_trash' => 'No recipes found in Trash.' ); $args = array( 'public' => true, 'labels' => $labels, 'description' => 'My yummy recipes will be published using this post type' ); register_post_type( 'recipe', $args ); } add_action( 'init', 'my_custom_post_types' );
Note that in the previous example we used the label property, this example uses labels. Make sure to use translation functions if your work will be for public consumption.
Menu Customization
You can use three functions to modify the behaviour of the menu entry for your custom post type. show_in_menu sets where the menu is shown. If set to false the menu entry is not shown. If set to true it will be shown as a top level menu. You can set it to an existing top level page like upload.php to add it as a sub-menu.
The menu_position property sets where the menu shows up in the top-level list. Take a look at the Codex for the numbers to use for specific placements.
Finally, the menu_icon parameter allows you to set an icon. You can add a URL to an icon, or you can use the name of an icon from Dashicons which now ships with WordPress.
function my_custom_post_types() { $args = array( 'menu_position' => 20, 'menu_icon' => 'dashicons-carrot' ); register_post_type( 'recipe', $args ); } add_action( 'init', 'my_custom_post_types' );
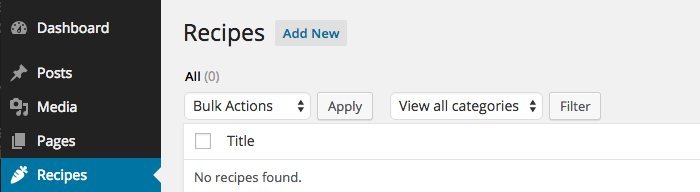
The code above will add our post type as a top level menu entry into position 20 (which is just below pages) and It will use the carrot icon from the Dashicons set.
Post Type Interaction Messages
Whenever you perform an action on a post (saving, deleting, searching, etc.) you receive messages which give you feedback about your action. These messages can be tailored to the post type using the post_updated_messages filter. All we need to do is define an array for the custom post type with the appropriate messages.
Contextual Help
Ever noticed the help tab in your posts or pages section? If you click there you’ll see that you can add a great little help section split into tabs. Adding contextual help is extremely important as it allows users to get help on the spot. This is better for them and better for you as well – the fewer support requests you get, the better. We’ll need to use the $screen object in the function we hook to admin_head. The template for adding help sections is quite straightforward.
All Together
The code to register a recipe post type, along with interaction messages and help sections would look something like the example below. Don’t forget the settings you use are ultimately up to what your project requires.
add_action( 'init', 'my_recipes' ); add_filter( 'post_updated_messages', 'my_recipes_messages' ); add_action( 'admin_head', 'my_recipes_help' ); function my_recipes() { $labels = array( 'name' => 'Recipes', 'singular_name' => 'Recipe', 'menu_name' => 'Recipes', 'name_admin_bar' => 'Recipe', 'add_new' => 'Add New', 'add_new_item' => 'Add New Recipe', 'new_item' => 'New Recipe', 'edit_item' => 'Edit Recipe', 'view_item' => 'View Recipe', 'all_items' => 'All Recipes', 'search_items' => 'Search Recipes', 'parent_item_colon' => 'Parent Recipes:', 'not_found' => 'No recipes found.', 'not_found_in_trash' => 'No recipes found in Trash.' ); $args = array( 'labels' => $labels, 'public' => true, 'rewrite' => array( 'slug' => 'recipe' ), 'has_archive' => true, 'menu_position' => 20, 'menu_icon' => 'dashicons-carrot', 'taxonomies' => array( 'post_tag', 'category' ), 'supports' => array( 'title', 'editor', 'author', 'thumbnail', 'excerpt', 'custom-fields', 'comments' ) ); register_post_type( 'my_recipe', $args ); } function my_recipes_messages( $messages ) { $post = get_post(); $messages['recipe'] = array( 0 => '', 1 => 'Recipe updated.', 2 => 'Custom field updated.', 3 => 'Custom field deleted.', 4 => 'Recipe updated.', 5 => isset( $_GET['revision'] ) ? sprintf( 'Recipe restored to revision from %s',wp_post_revision_title( (int) $_GET['revision'], false ) ) : false, 6 => 'Recipe published.', 7 => 'Recipe saved.', 8 => 'Recipe submitted.', 9 => sprintf( 'Recipe scheduled for: <strong>%1$s</strong>.', date_i18n( 'M j, Y @ G:i', strtotime( $post->post_date ) ) ), 10 => 'Recipe draft updated.' ); return $messages; } function my_recipes_help() { $screen = get_current_screen(); if ( 'recipe' != $screen->post_type ) { return; } $basics = array( 'id' => 'recipe_basics', 'title' => 'Recipe Basics', 'content' => 'Content for help tab here' ); $formatting = array( 'id' => 'recipe_formatting', 'title' => 'Recipe Formatting', 'content' => 'Content for help tab here' ); $screen->add_help_tab( $basics ); $screen->add_help_tab( $formatting ); }
Relate Article
Basis for wordpress themes plugin development