How to Monitor Your WordPress Site Easily to Minimize Downtime

Jetpack is powerful plugin that from WordPress.Com. It can supercharge your self-hosted WordPress site with the awesome cloud power of WordPress.com. It comes with 33 features including Monitor: “Jetpack Monitor will keep tabs on your site, and alert you the moment that downtime is detected.”
Monitor will check your site regularly to make sure it is running normally; if not, then it will notify you with an email saying your site is down (your will keep noticed if your site is not up after an hour).
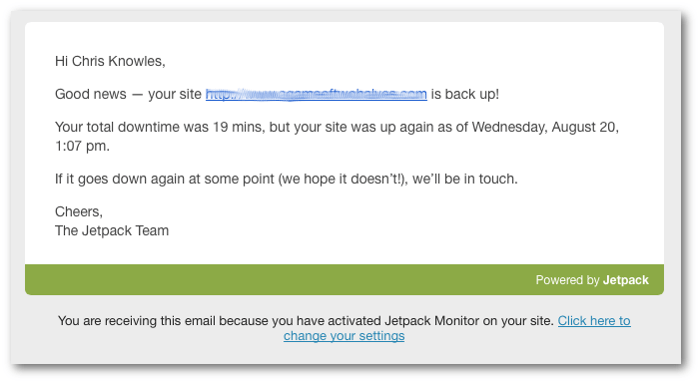
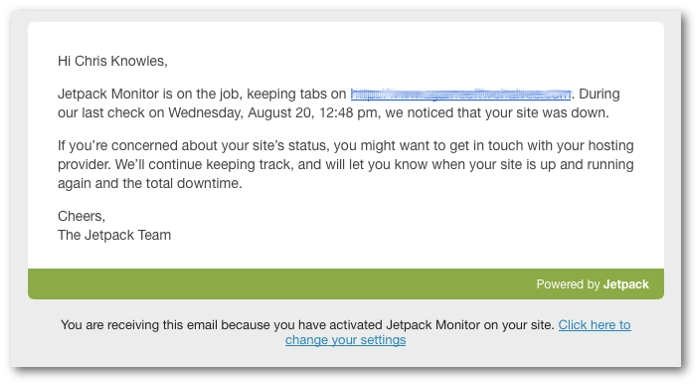 Meanwhile, when you site is back to normal, the Monitor will also send you an email to notify you. In the notification mail, the details about the when the down time starts, and when it came to end are also included so that you can track your uptime against an SLA.
 Tip: Do install email to your phone to make sure you can get notified once downtime is detected.
Like using all other plugins, to use Monitor in Jetpack, you may think you only need to install the plugin and then active it; but here, you need to do something more.
Tip: Do install email to your phone to make sure you can get notified once downtime is detected.
Like using all other plugins, to use Monitor in Jetpack, you may think you only need to install the plugin and then active it; but here, you need to do something more.
Step 1. Install the plugin
As this plugin is free, you can directly search this plugin in your plugin page when you are logged in to your dashboard. In the Plugins>Add new, and then search Jetpack, hit Install. After the installing is done, hit Active the plugin. After that, you will be asked to connect your site to WordPress.com, just do following the steps that come after. If you have a WordPress.Com accout, you can finish the connection with a one click; if not, you need to register an account on WordPress.comOnce your site is linked to WordPress.com, you’ll be able to activate Jetpacks modules. After that, you will be lead to the Settings page to active the plugin. In fact, 19 modules have been activated automatically. In the Settings page, you can deactivate anyone you do not need, and configure the plugins that are activated already.
Step 2 – Activate And Configure Monitor
You need to activate Monitor module manually as it is not among the ones that are automatically activated. A message will come up once the Monitor is activated. Now, hit Configure to make sure the notification to be sent to your email. In fact, here is only two option in the Configure page: whether to receive notifications and which mail do you like to receive notifications. The email address here is which you used to register on WordPress.com, if you would like to change it, just hit Edit, then you will be directed to your WordPress account page to change the email address
Aside from Monitor, the Jatpack plugin has other 32 features, just explore them yourselves!
In fact, here is only two option in the Configure page: whether to receive notifications and which mail do you like to receive notifications. The email address here is which you used to register on WordPress.com, if you would like to change it, just hit Edit, then you will be directed to your WordPress account page to change the email address
Aside from Monitor, the Jatpack plugin has other 32 features, just explore them yourselves!
27
Aug
Aug